Thursday, October 22, 2009

Making my own gift bags...

So this year I decided to make my own fabric gift bags for Christmas instead of wrapping everything in paper which then gets thrown away. Actually I decided to do this about 3 years ago but just actually started the process on Monday. Since this is my crafty blog I decided to document the process - at least in the beginning. I started with some fabric that my wonderful mom sent to me (3 years ago - yes I am suitably embarrassed that it has taken me this long to get started), then I went to the Arts & Crafts center on base and bought 2 more designs as well as some cotton batting and then ordered 3 additional fabrics from Joann Fabrics - can't wait to get those in the mail....Debbie Mumm coordinating fabrics - can you say YUMMO?

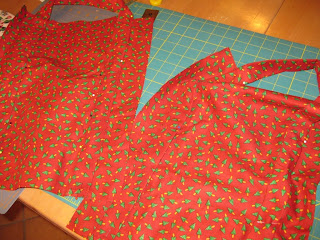
cutting the pieces

folding and pressing the handles

pinning the handles on for topstitching

finished product - like a tote bag

I added 3 large buttons and ribbon loops to hold the bag closed against prying eyes

this bag is a quick one similar to a pillowcase but with boxed corners at one end making it gussetted for holding things

close up shot of the ribbon I sewed on and the button I added as an embellishment


I hope to make some more soon and post them as well. Took me longer than I expected to make the first bag because I was trying to noodle out how to sew square corners. I used to do that so easily but it has been so long since I actually set up and turned on my sewing machine that I forgot. AFTER I completed the bag I played around on some scrap cloth and VOILA I remember now. My other bags will be similar patterns but I will be using 2-3 fabrics instead of just one. And I have an absolutely cute pattern for a quilted gift bag - this will be a gift all by itself but I still plan on using it as a "gift bag" and not just the gift.

Friday, October 9, 2009

New online store

In case you didn't notice the new bling at the top of my page on the left-side I will tell you about it. I finally took the initiative to sign up for an online store to sell my handmade cards. Take a look and tell me what you think. I will be adding to that store various items in time. I hope to add card kits, gift tags, card sets, etc. Hope this works out for me. I am super excited and just a bit nervous. I really want this to be profitable. Mainly because it means I get to craft and make money at it. Then I can support this addiction to crafting supplies!

Wish me luck.

Wednesday, October 7, 2009

Challah Bread Recipe

You asked for it so I am posting it: the recipe for that fabulous bread.

First I started here Artisan Bread then I turned to page 180.

This recipe is easily doubled or halved and makes four 1-pound loaves.

1 3/4 cups lukewarm water
1 1/2 tbsp yeast (2 packets)
1 1/2 tbsp kosher salt
4 large eggs, beaten
1/2 cup honey
1/2 cup unsalted butter, melted (I used salted and it still turned out tasty)
7 cups unbleached all purpose flour (I used a mixture of all purpose and whole wheat)
egg wash (1 beaten egg with 1 tbsp water)

1. Mixing and storing the dough: Mix the yeast, salt, eggs, honey and melted butter with the water in a large (5qt) bowl, or lidded BUT NOT airtight container.

2. Mix in the flour without kneading. I use a large Pampered Chef rubber spatula (the one that looks almost like a scoop). When mixing by hand it can get a little tough but just keep going or you can use wet hands to incorporate that last bit of flour.

3. Cover (not airtight) and allow to rest at room temperature for at least 2 hours - until the dough rises and collapses or flattens on top.

4. The dough can now be used. However, it will be easier to handle when cold. Refrigerate in a lidded (not airtight) container and use over the next 5 days. Beyond 5 days, freeze in 1 lb portions in air tight container for up to 4 weeks. Defrost in the refrigerator overnight before using. Then allow the usual rest and rise time.

5. On baking day, butter or grease pan, cookie sheet, etc, or line with parchment paper or a silicone mat. Dust the surface of the refrigerated dough with flour and cut off a 1-lb (grapefruit size) piece. dust the piece with more flour and quickly shape into a ball by stretching the surface of the dough around to the bottom on all four sides, rotating the ball a quarter-turn as you go.

6. Now you can form the dough into whatever kind of loaf you want. Braided, shaped, etc. This is where I rolled it out flat and sprinkled on cinnamon sugar, craisins and pecans.

7. Allow the bread to rest and rise in or on prepared pan for 1 hour and 20 minutes (or just 40 minutes if you are using fresh, unrefrigerated dough)

8. If using a baking stone preheat the oven 20 minutes prior to baking time (this along with hot water ensures a crisp artisan crust). If not using a stone a 5 minute preheat is fine. Brush the loaf with egg wash.

9. Bake near the center of the oven for about 25 minutes. In my oven the time was closer to 50 minutes but I did make a 2 pound loaf.

10. TRY to allow it to cool before slicing and serving.

There you go. Easy as pie, er bread, that is.

You can think up any number of variations - some included in the book are a braid with poppy seeds on top, turban shaped with raisins, onion pletzel (savory flatbread), sticy pecan caramel rolls (or Brandi - leave out the pecans). Easy to make this into cinnamon rolls.

NOW go try this and let me know what you came up with.

Tuesday, October 6, 2009

Cranberry Pecan Challah


Just had to had a photo of the interior of my cranberry pecan bread. So yummy! It really did turn out so tasty. Makes a good breakfast.

Monday, October 5, 2009

WCMD CHALLENGE #4 - AUSTRALIA


For this challenge I again rifled through my supplies and found a tag I thought would be perfect. This tag is also one I have been hanging on to for about 6 or 7 years. Worked perfectly though. I went with the dotted part of the challenge. I used SU! Baroque Burgandy for the base layer (and because it matched the tag). Then I added PTI Kraft cardstock. Stamps used were all PTI - Faux Ribbon, Beyond Basics Text Style. Ink used also PTI - Fresh Snow and True Black. Hope you like this entry.

WCMD CHALLENGE #3 - INDIA

Here is my 3rd entry into Papertreyink's WCMD Challenge.

This time I used SU! Tempting Turquoise & Lovely Lilac cardstock, I added a piece of deco paper that I stamped on using SU! True Friend stamp set, and PTI Vintage Labels as well as Mega Mixed Messages in PTI True Black. The focal image was stamped in PTI Fresh Snow. I added 2 different color of stickles for the jeweled effect. Oh and the background is SU! Perfect Paisley in Versamark.

Sunday, October 4, 2009

Just a few of the cards I have made recently


We interrupt this card making for ...

BREAD - Challah to be exact.

I have been reading and trying recipes from this book Artisan Bread in Five Minutes a Day The recipes are simple and the method is beyond simple. NO KNEADING. I love it and the bread has turned out so yummy! Last week I made the Brioche and Boule recipes. The Boule recipe is very similar to a sourdough but without all the work. Awesome! When I made the Brioche dough last week (which is a light barely sweet bread) I told James I wanted to make it Cranberry Pecan Brioche and he said, "No make it Cinnamon Bread." So I made a very small portion of it Cranberry Pecan and the rest as Cinnamon Bread. He absolutely fell in love with the Cranberry Pecan portion (which was less than 2 inches of the entire loaf of bread) So this week I tried the Challah and Boule. The challah is much like the brioche but has 1/2 the eggs and butter of the brioche recipe. I decided to go ahead and make it Cranberry Pecan though. The other half of the dough will be used to make beignets (French doughnuts).

Here is 1/2 of the dough I mixed up yesterday.


After removing 1/2 of the dough, sprinkling a little flour to keep it from being sticky, I losely formed it into a ball and then rolled it out flat. Sprinkled it with cinnamon sugar ...

Then topped it with craisins and pecans.


Finally, I rolled it into a loaf shape and it is now resting. Resting and waiting for its egg wash before baking. I will post a picture of the finished product when I am done baking it.

TA DA - a loaf of Cranberry Pecan bread made with absolutely NO KNEADING! Don't you just love it?


I also want to add a picture of the Plum Cake with gooey frosting I made in between the resting and baking of the dough.this is a perfectly yummy cake. I really liked the flavor and texture of this cake.

I got this recipe courtesy of The Pioneer Woman who you will find here at her blog
The Pioneer Woman

WCMD CHALLENGE #2 - MEXICO


My second entry was pretty simple to put together. First I went through all my paper stashes to see if I had something to work with. Then I started going through these tags that I got when I participated in a swap about 6 or 7 years ago. (Yes, I am still hanging on to these old things). I found this brightly colored one that I thought would work perfectly. The sun and flowers and the combo of orange, purple and yellow with a little pink made me think of the bright wonderful colors in Mexican artwork. Hope you enjoy this entry.

Supplies: Papertreyink cardstock - orange zest, PTI stamp set Trajan Monogram and Polka Dot Basics.

Happy World Card Making Day!

I am participating in this WCMD Challenge to celebrate world card making day. Here is my entry for the first challenge...inspired by Japanese Art. While looking through my paper stash I found this deco paper and thought it was perfect. It was simple, depicted nature and had just the colors I was looking for Black, red (well more like pink) and a pale green.


One down, three more to go.

Supplies used: deco paper (had it so long I am not sure who makes it, Papertreyink stamp sets: Vintage Labels and Mega Mixed Messages, PTI cardstock & ink: Raspberry Fizz and True Black

blog background