Friday, February 26, 2010
Poppy Seed Challenge # 1
Today, I came across this CHALLENGE at Lisa's Poppy Paperie blog. I love her work and so I decided I would participate in this challenge.
Now, I have to tell the truth, this card turned out way different than I imagined. I think I like it though. The process was interesting and fun. Though I had originally planned on using ribbon roses as my light yellow accent they just didn't go with the flowers I stamped (in my mind, at least).
I really do like the color combination I chose though. I used Papertrey Ink's Terra Cotta Tile & Lemon Tart cardstock, using the Vintage Tea Dye Duo for distressing the edges. And I stamped the flowers from PTI Friends Til the End set on Rustic Cream before distressing the edges and then adding score tape and glitter so I could give the card the BLING (crystals) needed as one of the SEEDS of the challenge.
a close up of the bow area with yellow and orange wire that I twirled around (matches my colors really closely - YIPPEE)
The other seeds were: Use light yellow some where (that was my Lemon Tart card stock and the yellow COPICs I used when coloring the interior of my last seed, which was use a flower image.
I liked this challenge - would be pretty easy to combine this with some others if you "need" to complete more than one challenge.
I also have to admit that one thing I kind of like on the card was purely an accident. After stamping my sentiment on the card, I accidentally dropped my Dark Chocolate (PTI) inkpad onto the card stock. In order to cover my boo-boo, I lightly touched different areas of the card with the inkpad for the same look in multiple places.
the little rosettes I created
a close up
Wednesday, February 24, 2010
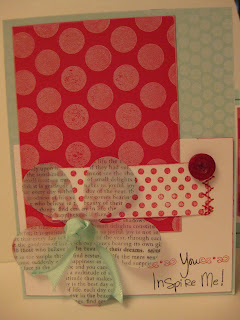
CAC ~ 5 Red & White Polka Dots!
Here is the next challenge from Becky...this one was a little easier as far as the colors went. I did try to step out of the box and do something a bit different. Our job was ONLY to stay within the cutting and color parameters, which is what I did! This was so fun I actually made 2! What do you think?
a close up of my sweet little flower - a clear flower that I stamped Papertrey Ink's Background Basics: Textstyle in black on it. Then I tied a knot in the Aqua Mist Satin Ribbon and notched the ends as "leaves".
I was even able to finally use my sewing machine on a card. That was fun! For my sentiment I, once again, used masking to create my own sentiment - I used two sentiments from PTI's Handwritten Notes.
This next close up is from my scallop punched flower with a satin ribbon knot in the button.
With this card, I used one of my new favorite techniques which is using a marker to outline the main image on the card. I then added some red dew drops to help the sentiment stand out.
SUPPLIES USED:
almost all Papertrey Ink
Stamp sets: Polka Dot Basics I & II, Background Basics: Textstyle, Handwritten Notes, Faux Ribbon, Signature Greetings
Paper: Aqua Mist, White & Pure Poppy cardstock, aqua mist patterned paper
INK: True Black, Pure Poppy, Fresh Snow, Aqua Mist
Embellies: Aqua Mist Satin Ribbon, Vintage Buttons, scallop punch
non PTI ~ dew drops, black marker, clear flower
Wednesday, February 17, 2010
CAC - 4 Green & Black
Today I decided to participate in another of Becky's challenges which can be found HERE.
Specific colors and dimensions are the order of the day. I have never made a long card like this so it was a nice departure from the norm.
Here are the "deets"...
I stamped the leafy branch image onto black cardstock with Versamark ink, then heat embossed using clear embossing powder. On the Green Leaves Ripe Avocado patterned paper I distressed the edges with Vintage Tea Dye Ink Duo and a little True Black ink. Then I applied narrow score tape and ultra fine glitter to the edges. I really like the look of the distressed edges and glitter. Now here I did depart from the challenge and use Vintage Cream cardstock instead of Stamper's Select White. I really wanted a softer, more vintage look so I changed the white to cream. On the bottom third I stamped a border and scallop image from Beyond Basic Borders. Then for the top I stamped the leafy branch again this time in True Black. I distressed the edges again with my Vintage Tea Dye Duo and then along the very edge I ran my black ink pad to give it just a very subtle border and to help it stand out from the Avocado layer. Finally, I used a sentiment from Big & Bold Wishes and made a little pennant tag for the top. Found a beautiful avocado green button in my PTI Vintage Button pack, tied it with black embroidery thread and applied above the sentiment. I distressed the edges of both layers for the sentiment, again using the Vintage Tea Dye Duo and True Black along the very edge. I also used a black marker to make a border on the top layer. Debated about adding yet more glitter and decided that one layer was probably enough - if that is possible. The last step was to tie and retie the bow until it was as close to perfect as I was going to get it and then add little green dew tops for a little bit of "bling".
Thanks for looking.
Ciao for now.
Saturday, February 13, 2010
Compose a Card with Becky -Challenge 3
I am participating in the challenge that you can find HERE at Becky's blog. It was difficult to work with this color scheme but I do like how it turned out. Really out of my comfort zone. Even though there were specific requirements like white embossed flower on Raspberry Fizz and a flourish stamped on Terracotta Tile, it still took me almost 2 hours to complete this. The flourish really is there ~ guess it didn't photograph well. You can see it if you click on the photo for a larger image. First I experimented with several different flowers until I got one I liked. Then the process of cutting out the flower and leaves. I did enjoy the time crafting though.
Supplies: PTI (unless otherwise noted) Raspberry Fizz Mix, Spring Rain Bitty Box Basics, Everyday Blessings and Raspberry Fizz Bitty Dot Basics patterned paper, Terra Cotta Tile cardstock
Stamp Sets: Friends 'til the End, Fancy Flourishes & Signature Greetings
INK: Versamark, True Black and Tim Holtz Old Paper distress ink (for edges)
embellies: SU! white embossing powder, rhinestones, EK Success border punch, distressing tool
Wednesday, February 10, 2010
PTI - Day 9 - Color Favorite Challenge
I am just getting this one in the nick of time. I will post more about it once I get it posted and linked. This also qualifies for the Papertrey Peeps challenge to use buttons.
The colors I chose were Michelle's favorites ~ kraft, spring moss, aqua mist and vintage cream. I have to say that I love the way this card turned out. I think it is so pretty and soft. I used the PTI Pretty Pastels paper to paper piece the cupacke. I added an aqua mist button at the top, and inked just the little twirl in spring moss and stamped that above the cupcake. (The cupcake from Baby Button Bits was stamped twice so I could cut it out and paper piece it.) For the card base I used kraft cardstock, on the bottom I stamped Background Basics - Textstyle II in vintage cream ink, then I stamped over that with Polka Dot Basics II in spring moss. Such a soft effect that has. For the background paper I used Everyday Blessings which I lightly distressed with the vintage ink duo. The base on that was actually white and since I was going for cream I distressed the entire piece to cut the brightness of the white and make it look more cream. I really like how that softened the edges too and lent and overall soft, dreamy like quality to the card. I chose the rustic cream cardstock to layer my paper pieced cupcake on and place the sentiment from Cupcake Collection on. Then following Nichole's idea, I outlined the rectangle with a black pen, again I distressed the edges with the vintage ink duo. Then I added a small line of glue around the perimeter of this piece and glittered it up. I tied Spring Moss satin ribbon around the background paper and finished it off with a cream button tied with rustic twine. Finally, I glued and glittered the edge of the card to give a little bling to the bottom of the card as well.
Love this card. I really like how the distressed edges give a different look to the glitter on the edges. Hope you like how this turned out.
Ciao for now!
edited to add Guess I missed the deadline because I put my info into Mr. Linky - it was added and showed up. Then when I refreshed the page to see how many cards I needed to look at - it took away my entry plus about 50 others. According to my clock I still had 3 minutes to post. Oh well, maybe next time.
Monday, February 8, 2010
PTI - Day 8 - "paint" by number challenge
Okay, I finally finished this challenge. I had to sub all day in 2nd grade so I wasn't sure I would have time to complete the challenge before bed. However, I made it. Fortunately I had a good color palette to work with. I say good color palette because I needed a card for my son's 14th birthday on Saturday. Ta Da - one card - dual purposes.
I would blog a little more about this but it is time for bed. So I am posting and linking and heading off to dream time!
Supplies: ALL Papertrey Ink
stamps: Star Prints, Top Ten, Faux Ribbon
INK: Aqua Mist, Enchanted Evening, Spring Rain, vintage duo
Cardstock: Aqua Mist, Enchanted Evening, Kraft, White & Spring Rain
Ribbon: Enchanted Evening
Ciao for now.
Scrappy Gift Bag
So I decorated another gift bag! I LOVE, LOVE, LOVE how this one turned out. And it is created with mostly PTI products (papertrey ink for the uninitiated) which you can find HERE.
For the tag I just took random scraps that I had and adhered them to a piece of lightweight chipboard, then I ran it through by cuttlebug using a tag die by Sizzix. LOVE IT! Just love that tag. I am seriously excited about how cute the tag turned out.
Mind you these were really just random scraps. I did try to make sure the colors were pleasing together but otherwise there was no rhyme or reason to why I chose that particlar strip ~ other than it was thin and suitable for the purpose.
I took another large scrap of Friends 'til the End decorative paper and put that about midway on the bag just above the bottom portion that I stamped with Polka Dot Basics using Fresh Snow Ink. Over that I took another scrap and just stamped the words from Top Ten and Top Ten additions.
I took the ribbon tag - another scrap just laying around (I try to cut multiple things at once so I am not wasting the turning of my wrist on that machine). I popped that up on pop dots and then put prima flowers with brads in the end. Because I used the Friends 'til the End paper on the tag and the bag I also stamped the flower from Friends 'til the end on the ribbon tag and the words for the sentiment on the tag.
Finally, I finished up the tag by adding a strip of glitter, two more prima flowers with a large brad in the center and tied with grossgrain ribbon. The grossgrain ribbon is used to tie the tag to the bag. Then around that ribbon, I added a large bow using organdy ribbon.
Really am proud at how this turned out!
Sunday, February 7, 2010
2nd attempt CPS Sketch 153 & PTI Day 7 Challenge
My second attempt at this challenge was a card. I am trying to step out of my comfort zone and use the Black & White patterned paper and Raspberry Fizz. I love the idea of both of them and have completed a few projects lately with them BUT it definitely is a reach for me. I tend to love autumn colors so I am trying to go out on a limb and try something different for me. Hope you like my attempts.
Supplies: PTI cardstock & patterned paper, buttons, ribbon, Heart Prints stamp set
Non-PTI supplies: black stickles, white embroidery thread, border punch
CPS Sketch 153 and PTI - day 7 Challenge
Today's challenge was to use the CPS Sketch. I made two different items using this sketch. The first one was a gift bag.
supplies: PTI Polka Dot Parade, Bitty Box Basics (in Summer Sun, Ocean Tides & Chocolate) patterned paper, PTI Digi Images, PTI Summer Sun, chocolate & Ocean Tides ribbons, gift bag - SU!, glitter - Martha Stewart, tag - Sizzix die
Wednesday, February 3, 2010
Papertrey Ink Birthday Bash ~ part IV ~ last one
Well folks I just ran out of time. Needed to get these posted by 7am EST. This one may not make it. Going to post and come back and tell you about it.
I totally cheated and added this to one of the gift boxes I made. I had cut the tag out already and thought it would be cute with the little cupcake. The cupcake image is another digi image provided by the PTI team.
I think the tag is a little big. Needs to be on a bigger bag or box. But still wanted to get the image done in time for the PTI birthday bash contest. The winner receives several free stamp sets so this is a big prize!
Papertrey Ink Birthday Bash ~ part III
Papertrey Ink Birthday Bash ~ part II
Papertrey Ink Birthday Bash
In celebration of PTI's 3rd anniversary the 2010 stamp designers each contributed a digi image for us to use to create a birthday card. And by us, I mean, we, the PTI obsessed. The first image I have worked with is from the new Studio 64 line. Love it! Since this is a BIRTHday bash I created a birthday card. Don't think it shows up well in the photo but it does say WISH BIG (PTI Big & Bold Wishes stamp set) and on the hill itself reads "It's gonna be your best birthday yet". I thought that was appropriate to celebrate PTI's 3rd year. For a little background I used Polka Dot Basics II in original Spring Rain ink as the sky. I also added stickles to the clouds, balloon and sun after coloring in the entire image with my copic markers.
The second one is what I was actually thinking when I saw the image and that is "Love is in the air". So I paired the digi image with a saying in PTI's Tiny Treats: Valentine set and the little heart in Heart Prints.
Happy Anniversary PTI! I am going to try and make a few more cards using some of the other digi images but I am under a time constraint to get them posted in time.
Tuesday, February 2, 2010
Valentine Goodies...
Our FRG (Family Readiness Group) is having a Valentine's dinner next week. I am in charge of the prizes we are giving away. There will be prizes for longest married, newest married, shortest engagement etc. These little darlings are what I created to hold chocolates. Very little stamping done but lots of cutting and glueing and fiddling.
Supplies: Basic Grey Blush decorative paper, SU! Soft Sky deco paper and Lovely Lilac cardstock, Papertrey Ink Black & White Mix deco paper, SU! & Papertrey Ink ribbons (too many colors to list), various punches, brads, colored staples, etc and the workhorse behind the whole project: Papertrey Ink's clear boxes that their stamp sets come in. WooHoo! I knew I kept all those boxes for a reason. Now I am putting them to good use.
I also used SU! 22 guage (at least I think it is 22) wire to make the handles for the little baskets. Each basket has a different kind of handle. One has lots of ribbon bits tied on it, another has fabulous chocolate satin ribbon wrapped around the wire and a big, fluffy bow tied on each end. Another is just 2 ribbons layered with wire in between them. I was trying to keep them from looking too much like cookie cutter pieces. I wanted each one to be unique. I have at least two more to do and I will post them when I finish with them. One is almost done, just need to come up with the handle and the other is still being thought about. Enjoy my creations! And thanks to all my fellow PTI bloggers who submitted photos of their creations which inspired me to start creating something with those fabulous boxes!
Subscribe to:
Posts (Atom)